Tuesday, August 4, 2009

Done!

"Her Sampler"! She is finished!!

Whee! A finished cross stitch always supplies a great sense of accomplishment. I think it's the perfect craft when you can only sneak in a few stitches here and there. (Or sit for hours hunched up in the corner of the living room in the wee hours squinting through reading glasses- you know, either way.)

A side note for cross stitchers, from my experience as a custom framer- please leave a nice margin around your images, say three inches or so. If you have your work professionally stretched and framed, the framer will LOVE you if you leave enough extra to work with around the edges. Also, try your best to keep your work nice and clean while you work on it, and press it nicely (from the back) before you take it in. I have seen some dirty, soiled embroidery come through the shop, and it's a real shame they didn't take the time to clean the work beforehand.

Onward! I'm working on stitchy gift for Dad, so I'll be taking a brief break from samplers, which I have decided that I adore. I have a number of them in queue after this- I'd better stitch faster!

Friday, July 24, 2009

Stuff With Scraps #5


I have been obsessing over finding the perfect snap coin purse for a long time.  I had a great one for a while- it was leather, the ideal size- but I lost it somehow.

Years pass.

I start teaching (and shopping!) regularly at the workroom.  One day...

"What's this?  Metal purse frames?!  I could make my own coin purse?!"  This idea cooked in my brain for quite some time.  This week, after realizing that I would not be able to attend Reva's Snap Coin Purse class, which I've been wanting to take for ages (drat!), I decided to take matters into my own hands.

It's not perfect, that's for sure, but look how cute!  I'm sure Reva has some tips that would make it all come out even better.  The hex patchwork is from a chunk of it I made last year.  The fabrics are all Japanese scraps leftover from when a friend was finished cutting out the pieces for her quilt. ("Umm, are you going to throw those out?")

I will now pay for all cash purchases with exact change just so I can show it off.

Thursday, July 16, 2009

Just... one... more...


One more English paper pieced pillow.  Here's how it happens...

We plan a road trip that involves several hours in the car, followed by a few days away from the sewing machine, then several more hours in the car driving back.

I'm not driving.  My hands will be free, and not working on something during all those free hours isn't appealing.  So, I cut a whole bunch of papers, quickly pick out a batch of scraps from the scrap bin, iron the papers to the back, pack an abbreviated sewing kit, and I can be happily on my way.

This patchwork was started last month on such a road trip, and since I don't want to be a collector of (more) half-done projects, I made it big enough to be a pillow top.  I finished it up yesterday.  Yay!!  I had another pillow that was looking sort of worn out, so I ripped off the old cover and crammed the form into this new cover.  It was a tight squeeze, but I managed to get the zipper closed.  Yess!!

Sunday, July 12, 2009

Busy Hands


Since I just completed (yet another) English paper pieced pillow top, I needed a new project to work on while waiting for kids at lessons.

I love love love Carriage House Samplings.  Their designs all have that early American, folky-but-not-cutesy look that I really go for.  Plus, I find myself very attracted to alphabet samplers, and they have lots.

My most recent major proud accomplishment has been getting my sister into cross stitch!!  She lives in Houston, Texas and given their crazy, tropical storm prone weather, I decided she needed to have a hobby to work on when the power went out.  So, I hooked her up with a pattern I knew she would love, and all the floss and everything, and now she's going like gangbusters.

Problem is, even in a huge city like Houston, she can't find a cross stitch and embroidery dedicated shop...  I KNOW!!  Needlepoint, no problem, but not cross stitch.  Go figure.

I, on the other hand, am spoiled for choice here in Toronto, with not one but TWO lovely stitching shops within 15 minutes of my house- The Sampler on Browns Line in Toronto, and Gitta's on Lakeshore in Port Credit.  I was in Gitta's the other day and called my sister to gloat, because I'm evil.

Anyway, new project, and I'm well on my way!

Tuesday, June 30, 2009

Black Creek Pioneer Village!


School's out!  June end-of-school madness is OVER!  Yaaaay!!

To celebrate, I took my daughter to Toronto's Black Creek Pioneer Village.  Of course, there was quite a bit of quilty goodness there.  Check out these lovely old Log Cabin quilts!

The first one was in the building with the man making brooms.  He informed me that the Log Cabin design was considered a manly one for a quilt.  It is very scrappy (then again, they all were), with the logs about a half an inch wide, six deep all around the centres- hefty and substantial with all that wool.

The next one I found had traditional red centres.  I couldn't get my grabby paws on it, though.

And look!  A Log Cabin puzzle for kids!  This was part of a hands-on exhibit.  I love how under each "patch" there is a little title of where the fabric came from.  So smart!


I'm really looking forward to teaching my Log Cabin workshop at the workroom this month!  Seeing all these old lovelies was extra inspiring.

Wednesday, April 8, 2009

Tutorial: Mitered Borders for Quilts


Give your quilt top a classy touch with an elegantly mitered border!  Here's how...

Just work with me for a moment with sketches for the first few steps to get us going.  Step-by-step photos are included.  (Think if it like the opening scenes of The Wizard of Oz in black and white, followed by glorious Technicolor!)

Ready?

Here is your quilt top, face down so I can show you more clearly where you will stitch.

Cut your 4 border strips to the required width.  The examples in the photos are with borders that are 3 1/2" wide.

Now, determine the length of each border strip by adding the length of a side PLUS the width of the border times two PLUS a little extra (a couple inches).  If you have a square quilt, all 4 will be the same.  If a rectangle, then you'll have two short and two long.  But you already figured that out...  never mind...

 
Use a 1/4" seam allowance.  Sew each border strip to its correct edge on the quilt top, right sides together, matching centre of quilt top edge to centre of border strip.  Begin a 1/4" in from the starting end and stop 1/4" from the other end.  You'll have an equal amount of overhang on each end.

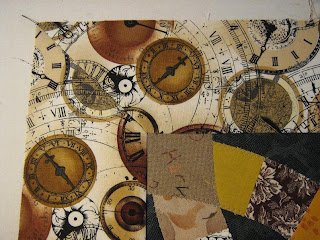
Turn over to right side, open out your border and press seam allowance away from the quilt top so it sits under the border.  Press.

Attach opposite edge's border strip in the same way, making sure you start your stitching 1/4" in from starting end and stop 1/4" before you reach the other end.  Turn over, open out border and press away from the quilt top.

Add remaining two border strips the same way.

Now you have all four border strips attached, but with free-flapping ends at the corners.

(Cue the pretty photos...)

Work on one corner at a time.

Overlap the corners, nice and square.


Pin together so they don't shift while you trim.

Trim off extra fabric as shown.  Just trim carefully with scissors and skip the rotary cutter.  Now your two strips will meet perfectly in the corner.


Carefully un-pin so the corner will lie flat while you mark.  On the wrong side of your overlapped corner,  mark a fine pencil line from the outer corner to the inner corner where the stitching line from attaching the border strips form a wee little right angle at the corner of the quilt top.


Now un-lap the corners, fold your quilt top on the diagonal (right sides together) and match up the corners of the border strips.


Pin along the pencil line for stitching, making sure to keep the border seam allowances free where the meet at the corner of the quilt top.  (We want to keep all the seam allowances free and not caught accidentally in other seams.  We are constructing a "Y seam.")


Start stitching at inside border corner (1/4" from the edge) and stitch along pencil line right to outside border corners.

Open out the borders.  Finger-press the corner seam open, then press.


Trim off excess fabric, leaving about a 1/4" seam allowance...

...and VOILA!!  Look at your pretty mitered corner!

Now do three more just like it.  Easy peasy!

Tuesday, March 10, 2009

New York!


I just got back from a weekend in New York! Wheeeee!!! A friend and I had been talking about going forever, and so we had to jump on the opportunity when her friend generously offered to host the two of us for a weekend.

Where to begin? Purl Patchwork in Soho, Kate's Paperie, MoMA, the Metropolitan Museum of Art, Grand Central Station, the Chrysler Building- I could go on and on (and on...)

This is Robert Rauschenberg's "Bed"- painted on a quilt.

Everything was fabulous and exciting, but I have to say that the art museums were overwhelmingly awe-inspiring. After all those Art History slide lectures back in art school a million years ago, to see many of those famous works in person was just incredible. Walking through was like, oh look! Famous painting! And another! And another! And, hey, I wrote a paper on that! And, oh! I didn't realize how gigantic that piece is in real life!

Utterly amazing.

Friday, February 20, 2009

Betrayal!


I noticed a while back that Coats & Clark had done a huge overhaul of their threads, with brand-new display racks and a new spool design. C & C thread has always been my favourite thread for general sewing and quilting. I loved visiting the fabric store on a thread-buying mission, and seeing row upon lovely row of delicious colour, made even more appealing with their slight, shiny-cotton sheen.

When the switch-over to the new look happened, many shops tossed all their old C & C spools in clearance bins and marked them down. I stocked up.

Today, after looking through my thread stash and not finding the colour I wanted, I headed out to Fabricland, and bee-lined to the Coats & Clark rack. As I was holding up spools next to my little fabric swatches, I noticed an odd thing- the thread was all sort of dull. No hint of shiny-cotton sheen. Hmmm...

Then I took a closer look, first at the rack labels, then at the paper spool sticker... My beloved Dual Duty was no longer composed of cotton-wrapped polyester, but was now "polyester-wrapped polyester." WHAAAT? The entire display was now 100% polyester!! And dull, dull, DULL!! My choices are now 100% polyester (which boasts the biggest variety of colour), various weights of 100% cotton (not always a fave), and one small section of the old cotton-wrapped polyester, which is labeled for machine quilting, and only comes in a comparatively few colours.


Look at the bigger spool (the dull "polyester-wrapped polyester"- redundant!) compared to the smaller spool (shiny and pretty). Also witness the tragic black "X" on the little spool- the mark of clearanced, unwanted thread!!

I really really liked the old, slightly shiny threads. Why, why, WHY? I'm sure my indignation will fade eventually, but for today, I'm crabby and resentful.

What's the deal, Coats & Clark?!

Tuesday, February 17, 2009

New Things


An envelope from eQuilter is like Christmas, only better!! This Paris print made my heart skip a beat, and I had to jump on it! And there's a few other prints in there, too... ahem...


A trip to Cloverdale Sewing Centre for snaps only resulted in a few other tiny, happiness-making purchases, too. New sewing machine needles- totally necessary. But this little wee tin that houses a measuring tape? Had to have! I'm a sucker for a cute tin!!

Friday, January 30, 2009

Double Wedding Ring


Okay. The show is up, and I can start digging through the stash again. Bliss! My first order of business was an idea that has been buzzing in my brain since the fall. On one of my visits to the ever-delightful Quilt Sundays at the workroom, I got into more than one conversation about a certain popular quilt pattern that looks absolutely fantastic, but turns out to be challenging to make. Make that extremely challenging. Challenging as in "I'm losing the will to ever sew again."

Not on my watch. No, Ma'am.

How about this: Easy. Quick. Fun. Yes, I'm talking about the diabolical Double Wedding Ring!! I have tamed the beast! This evil Bridezilla has been cut down to size and made simple and fun. In fact, this just might be the new "potato chip" of my quilting repertoire. I can't stop at just one!

This is destined for a class at the workroom... Wheee!

Tuesday, January 13, 2009

The Big Show!


Hey, everyone! Contrary to popular belief, I have not dropped off the face of the earth...

I've been getting ready for my solo quilt show at Greenwood Quiltery!! Hooray!!

It's running from January 14th through February 28th, and I'll be there this Saturday the 17th from 2 to 4 in the afternoon. So, drop by and say Hello and eat some snacks! Or I will have to eat them all myself, and that is never a good thing. Plus, you can check out this lovely shop with bolt after bolt (and skein after skein) of gorgeousness.

And... Happy New Year! I resolve to be a better blog poster and also to carry fewer bags around with me. Lately I've been feeling like a pack mule on a mountaineering expedition. Too many bags!! Edit, Johanna, edit!!

See you Saturday!