Give your quilt top a classy touch with an elegantly mitered border! Here's how...
Just work with me for a moment with sketches for the first few steps to get us going. Step-by-step photos are included. (Think if it like the opening scenes of The Wizard of Oz in black and white, followed by glorious Technicolor!)
Ready?
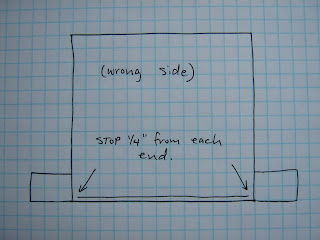
Here is your quilt top, face down so I can show you more clearly where you will stitch.

Cut your 4 border strips to the required width. The examples in the photos are with borders that are 3 1/2" wide.
Now, determine the length of each border strip by adding the length of a side PLUS the width of the border times two PLUS a little extra (a couple inches). If you have a square quilt, all 4 will be the same. If a rectangle, then you'll have two short and two long. But you already figured that out... never mind...
Use a 1/4" seam allowance. Sew each border strip to its correct edge on the quilt top, right sides together, matching centre of quilt top edge to centre of border strip. Begin a 1/4" in from the starting end and stop 1/4" from the other end. You'll have an equal amount of overhang on each end.
Turn over to right side, open out your border and press seam allowance away from the quilt top so it sits under the border. Press.

Attach opposite edge's border strip in the same way, making sure you start your stitching 1/4" in from starting end and stop 1/4" before you reach the other end. Turn over, open out border and press away from the quilt top.
Add remaining two border strips the same way.
Now you have all four border strips attached, but with free-flapping ends at the corners.
(Cue the pretty photos...)
Work on one corner at a time.
Overlap the corners, nice and square.


Pin together so they don't shift while you trim.

Trim off extra fabric as shown. Just trim carefully with scissors and skip the rotary cutter. Now your two strips will meet perfectly in the corner.


Carefully un-pin so the corner will lie flat while you mark. On the wrong side of your overlapped corner, mark a fine pencil line from the outer corner to the inner corner where the stitching line from attaching the border strips form a wee little right angle at the corner of the quilt top.

Now un-lap the corners, fold your quilt top on the diagonal (right sides together) and match up the corners of the border strips.

Pin along the pencil line for stitching, making sure to keep the border seam allowances free where the meet at the corner of the quilt top. (We want to keep all the seam allowances free and not caught accidentally in other seams. We are constructing a "Y seam.")

Start stitching at inside border corner (1/4" from the edge) and stitch along pencil line right to outside border corners.

Open out the borders. Finger-press the corner seam open, then press.


Trim off excess fabric, leaving about a 1/4" seam allowance...

...and VOILA!! Look at your pretty mitered corner!

Now do three more just like it. Easy peasy!


